The Walking Dead: Painting Comic Book Style!
By David –

The Walking Dead: All Out War is the fantastic new tabletop miniatures board game from Mantic Games, based of the Robert Kirkman's best selling comic book series.
So it was a great choice for my first hobby project of 2017, as it enabled me to try out a completely new painting style utilising black & white techniques to emulate pen style comic book illustration. Now it's time to see how things turned out…
The Painting Dead
Before I started working on the miniatures from the All Out War Core Set I took a look at what my fellow hobbyists had been up to on the Mantic's The Walking Dead Fanactics facebook page.{target:_blank} to decide what style to go for.
There were plenty of people who had used a variety of different techniques to produce greyscale or monochrome paint jobs, from the most basic approach of spraying white and washing with black, through to painting in a traditional style just using a grey palette to shade and highlight.
But I wanted to try out something a bit new and different, so I decided using black and white and to use brush work to reproduce the pen black lined & cross hatched style of the comic. So I picked up the Ammo of Mig Jimenez Black & White Technique Set.
This set is designed for the Black & White Technique used by some scale modellers, in which all the shading, highlighting and weathering is done in black and white and then a transparent base colour is applied over the top to produce the finished piece (more on this later).
In the end the walkers were painted using just the Matt Black and Matt White paints from the set. I'd place a drop of each onto my palette, along with some drying retarder medium, and simply mix the greys as required.
Here's the breakdown of the method used:
- Spray prime white, i used GW Corax White
- Make a dark charcoal grey mix of 80% Black, 20% White and use this to shade the recesses of the model
- Over several stages mix lighter greys and apply them to the less shaded areas building up to the raised areas. I incorporated some light or dark variations in this stage to show differences in material and skin tone
- Apply black lining to all margins or joins between different layers of clothing and skin.
- Using black and a fine detail brush apply thin black lines and cross hatching to the deepest shadows, such as in the folds of cloth, arm pits, inside jackets.
- Black line in the fine recessed details on the face and hands, such as around the eyes and forehead.
- Apply spot highlights to the highest raised areas in white and areas which would catch the light. These highlights were applied sparingly and used primarily to increase the contrast between light and dark greys. I also used white to pick out any exposed bone details.
- Paint bases with Astrogranite Debris and then drybrush with white and paint the base rims black.
All the miniatures were primed at the same time and then I'd paint them individually, each taking around 15–20 minutes to complete. I did a few across each day during the public holidays and then 1 or 2 once I was back at work. Within a week they were all finished.


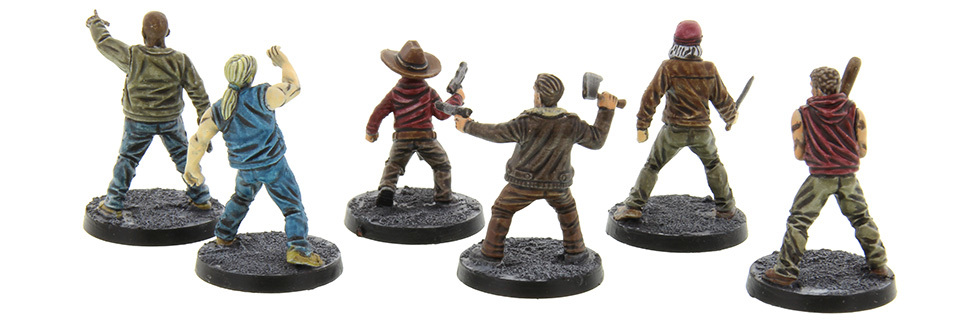
Painting the Survivors
I did a poll over on the Hobbies Facebook page the begining of the project to help decide between black & white or traditional styles for the set as a whole and one of our favourite responses was the suggestion to do both. With the survivors in colour they would stand out more on the tabletop.
But I also wanted to keep with the comic book them, so the idea was to colour them in just like I imagine comic book artists do. So to begin with the survivor miniature was painted in black & white pen style as above, just leaving out the grey tonal variations as that would be provided by the next step.
Then it was time to grab a third bottle from the Black & White paint set, the Transparator. This is a really cool medium which you mix at a 50/50 ratio with another colour to give a transparent base. It works best when you apply it in multiple thin layers and don't let it pool in the recesses too much. I found that letting it dry for a minute or 2 between coats gave the best effect.
Using the transparator and a variety of different paints from by collection I could colour in each survivor, using the comic book covers as a reference guide. Then finally I went back and did a final stage of black lining and pen-style shading to complete the effect.

Tags: The Walking Dead, Tutorial and Painting
1 comment
You need to log in or create an account before you can post a comment.
Fantastic tutorial and top notch paint job. I'll be stealing that idea...