


How to Paint Citadel Woods.
By David –
In this Gorilla Tutorial I'll take you through a quick and easy way to paint up a Citadel Wood using the Agrellan Earth technical paint to add some extra texture. I'll also show you how to add a desert theme to the base.
You can find all the paints and weathering products used in this project here: Citadel Wood Tutorial

Preparation
Tools required:
- Plastic Cement
- Clippers
- Modeling knife or mould line remover
- putty/filler (optional)
- Black spray primer
The Citadel Wood is a full plastic kit including a scenic base and enough branches, trunks and leaves to make three trees with or without leaves. There's also some additional detail items such as warning posts, lanterns and hanging skulls so that you can make your wood more sinister.
Preparation and assembly is very straight forward. Simply use your clippers to cut the tree trunks and branches off the sprues, use plastic cement to glue each half of the trunks together and then once those are dry glue the branches in place. To make painting easy I suggest that you do not
Then using either a modelling knife or mould line remover scrape of the mould lines along the branches and trunks. If you want you can also fill in any gaps and joins with some filler or modelling putty.
You can also add some additional texture to the scenic base by applying some PVA glue and sprinkling on a mixture of sand, basing rocks and grit.
Finally give the trees and scenic base a coat of spray primer. I also primed the leaf components while they were still on their sprues but I'll cover painting those separately in another tutorial.
Painting the Trees
Paints Required:
- Agrellan Earth Technical paint
- Agrax Earthshade Shade
- Nuln Oil Shade
- Baneblade Brown Layer paint
- Ushabti Bone Layer paint
Click on any of the images to see full step by step photos.
Step One: Crackle Paint
The plastic trees already have a good amount of bark detail sculpted into them but they are a little smooth to my own tastes. So a really simple way to add some more texture and get a fantastic dry, cracked bark look is to use the Agrellan Earth Technical paint.
This method will also work great on Wood Elf Treemen or Dryads as well.

Agrellan Earth is formulated with a crackle medium, which means its surface will naturally form small cracks as it dries. The thicker the layer in which its applied the larger the cracks.
So simply take a large brush and apply a medium thickness coat to each of the trees, as well as the exposed roots on the scenic base. Try to avoid too much of the paint pooling inside the curves of the smaller branches.
After an hour or so this will be fully dry and you'll have the cracked, rough surface we're looking for.
Step Two: Wash
Adding a wash will help bring out the detail of the cracks and the tree trunks, as well as darken up the brown of the Agrellan Earth which is quite light in colour. My go-to wash for almost all my Warhammer projects is a 50/50 mix of Agrax Earthshade and Nuln Oil.
Just grab a large brush and apply the wash mix to the whole tree and remove any excess if it pools around the base or in the recesses.

Step Three: Dry Brush
One the wash has completely dried (I use a hair dryer to speed this up) it's time to highlight the raised details with some drybrushing.
Get a large flat brush and some Baneblade Brown, wipe most of it off on a paper towel and then give a moderate drybrush across the trunk and branches. Let this dry and then repeat with a light drybrush of Ushabti Bone, this time just focusing on the highest raised surfaces and most heavily cracked areas.
Painting the Desert Scenic Base
Paints required:
- Vallejo Desert Sand texture paint
- Vallejo Model Colour Stone Grey
- Agrax Earthshade
- Nuln Oil
- Ushabti Bone
- AK Interactive Africa Dust Effects (optional)
- AK Interactive North Africa Dust pigment (optional)
Step One: Base Coats
We've already painted the tree roots on the scenic base, so now its time to base coat the rest of the details. Also use the same method I describe below to paint the rocks and areas between the roots on the bases of each tree as well.
First up start by applying a couple of coats of Vallejo Desert Sand to the whole base, except for the roots and the exposed rock surfaces. This is a texture paint so it's best to use an old brush to do this as the grit in the paint can damage new brushes.
Then paint the rock surfaces a light grey or sandstone colour. I used Vallejo Stone Grey but there are also plenty of colours in the Citadel range which would also work.
Step Two: Wash & Dry Brush
Remember our 50/50 magic wash mix? We'll be applying that again to the whole scenic base, as well as the bases of each of the trees.
Once its dry go back and give the whole base a drybrush of Ushabti Bone, including both the earth areas and the exposed rock. This will bring out the texture and raised detail and also soften the transitions between the sandy ground and the rock.
Step Three: Dust Effects (Optional)
Now the trees and desert themed base are already looking great but if you want you can just a little bit of extra dust effects using some AK Interactive products.
Firstly take some Africa Dust Effects, which is a light translucent yellow weathering liquid. Apply some thin patches of this across the base, on some of the rocks, tree roots and bases of the trees. When this dries it will give the effect of a build-up of fine, soft sand and dust.
I also like to apply some North Africa Dust pigment to create small areas of deeper sand build-up. Just apply some scattered patches and use a Pigment Binder to hold them in place.
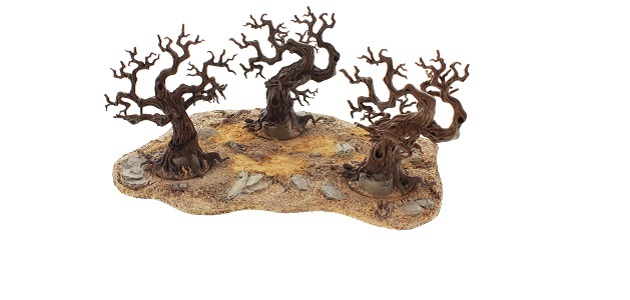
The Finished Product
Don't forget you can find all the paints and weathering products used in this project here: Citadel Wood Tutorial
From the Hobbies Gorilla
Tags: warhammer, Gorilla Tutorial, Warhammer 40,000 and How To
Add a comment
You need to log in or create an account before you can post a comment.